Summary: |
Interfaces with Andor Mosaic 3 Digital Mirror Device (DMD). The Andor Mosaic3 device allows phototargeting of microscope specimens. |
Author: |
Arthur Edelstein |
Documentation: |
Arthur Edelstein |
License: |
Properietary, closed source, Copyright Andor Technology 2014 |
Platforms: |
Windows |
Devices: |
MM-820*-SUB |
Installation
Driver
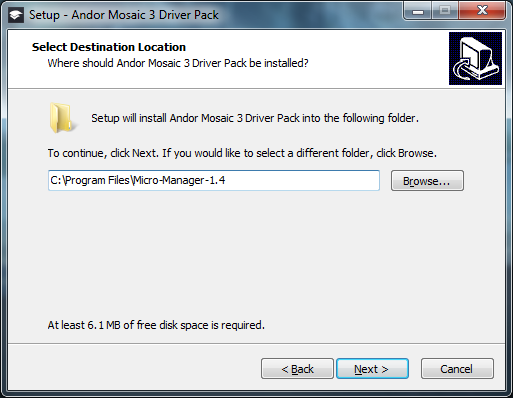
- Download the Andor Mosaic Driver 3 Pack from here.
Install the Driver Pack and when prompted for the destination location enter the path where Micro-Manager is installed as shown in the example below.
- Check that the driver for the PCIe card is recognized in the Device
Manager as
PLDA > PLDA Windows Driver.
Hardware Configuration Wizard
Mosaic
To allow Micro-Manager to control the Mosaic, add the Mosaic3 device using Micro-Manager’s Hardware Configuration Wizard. When you add the device, there are no configuration options.
Shutter control of the Projected Light Source
The Mosaic allows a low level of light through even when the digital mirrors are off, and therefore the Mosaic can be optionally purchased with the a physical shutter accessory. This shutter accessory is connected to a Vincent VCM-D1 controller, so to control it in Micro-Manager add the Vincent device.
Shutter control is primarily intended for light sources which cannot be directly modulated, like a Mercury lamp; for light sources that can be modulated, best practice is instead to simply connect the “DMD Active” TTL 5 volt output to your light source “global shutter” (or similar) TTL input so that it is only on when the Mosaic is active. You may not have the shutter accessory installed on if your system was ordered with the intention of using it with this type of TTL light source.
If you have the Power Technology diode laser, you may wish to still add the Vincent device because this laser always leaks ~4mW from the laser head even in the off position (0 volt Analog input). This laser leak is difficult to observe normally since the laser safety interlocks would shut off the laser.
Calibration
Controlling the Mosaic, like other SLM and Galvo devices, is done by the Projector plugin (Plugins | Device Control | Projector).
Many functions of the generically designed Projector plugin are not useful for the Mosaic. For normal use, one would just open the Projector plugin to go to the ROIs tab and open the Sequencing window.
Before you begin the calibration:
- Make sure a camera has been installed using the Hardware Configuration Wizard.
- In the Setup tab of the
Projector plugin:
- If your microscope system requires changing a property for the
Mosaic projected light to reach your specimen (often if your
imaging reflector cube is different from the mosaic reflector
cube), create a Group and a Presets each for your Mosaic
reflector and your epi imaging reflector. Assign the
Core-ChannelGroup to that Group, and finally in the
Phototargeting channelchoose the Mosaic reflector preset. - If you added the Vincent shutter device in the Hardware
Configuration Wizard, assign it to the
Phototargeting shutter.
- If your microscope system requires changing a property for the
Mosaic projected light to reach your specimen (often if your
imaging reflector cube is different from the mosaic reflector
cube), create a Group and a Presets each for your Mosaic
reflector and your epi imaging reflector. Assign the
Core-ChannelGroup to that Group, and finally in the
You may wish to refer to the Projector Plugin description page if you have not used it before. However, note that for the Mosaic:
- Point and Shoot tab: only projects a fixed-sized round ROI on the live image window and offers no flexibility of shape type and size.
- ROIs tab: is mainly used to open the Sequencing window. The Sequencing window has a super-set of the functionality of the other controls in the ROIs tab.
Focus on a test slide on the microscope stage. The mirror test slide is ideal since it provides a crisp reflection, but if you can’t get a good image from it due to optical filters you can consider a uniform fluorescent slide. Click the Calibrate button. The Projector Plugin will move through a rectangular lattice of spots across the Mosaic array, illuminating them one by one. The corresponding position on the camera image will be automatically measured. During the calibration procedure, a small cross will be visible overlaid on each spot as it is located. When calibration is finished, the plugin will have acquired and stored a coordinate mapping from camera pixels to Mosaic pixels.
Sequencing window
The Andor Mosaic offers advanced sequencing capabilities. To open the Sequencing Window, in the ROIs tab of the Projector Plugin, click the Sequencing... button. The button also opens the ImageJ ROI Manager.
 ROI list (2) Create ROI Grid panel (3) Sequence table editor (4) Create Sequence panel (5) Control buttons on bottom")
ROI list
Use the ROI Manager window to add, remove and update ROIs. If you are not as familiar with ImageJ ROIs or have been using the Mosaic in other software packages, read the Projector plugin’s discussion about drawing multiple ImageJ ROIs.
The intention of the ROI list is to add more properties to each ROI. The list synchronizes itself to contain the same set of ROIs as the ROI Manager.
| Column | Description |
|---|---|
| Roi # | Reference index number automatically generated. This gets referenced later on in the Sequence table. |
| Name | Copy of ROI name used in ROI Manager. |
| Mode | The default FRAP ROIs appears for short periods of time, whereas Image ROIs are intended to be illuminated throughout the whole sequence. |
| Intensity | Sets the projected light intensity level if you have PixelMode set to one of the gray scale settings. |
Create ROI Grid
To aid a specific use case, this feature duplicates a ROI generating a rectangular grid (lattice) of ROIs. Draw the ROI you wish to duplicate in the upper-left corner of your intended grid, enter the number of ROIs across and down and spacing between lattice points.
Sequence table
It’s often better to use Create Sequence to populate the sequence table instead of hand-filling an empty Sequence table. The Sequence table is being described first to introduce the nomenclature (particularly the Time Slot) of the Create Sequence generator.
| Column | Description |
|---|---|
| Time Slot | Reference index number generated by clicking the Generatesequence button in the Create Sequence panel, or by the Add button under under the Sequence table. |
| ROIs | “Roi #” value in ROI list. This can also take a range of Roi #s, e.g. 1-3,5,7,9-11. |
| On Duration (ms) | Illumination time. |
| Off Duration (ms) | Off time after Time Slot |
| Loops | Number of times the ROIs should be repeatedly illuminated within the Time Slot. To repeat the entire Sequence table, set the “Sequence Repeats” number below the Sequence table. |
Create Sequence
ROI sequences consist of a time slots or steps. Within each time slot 1 or more ROIs can be illuminated.
Item |
Description |
|---|---|
Sequence type |
Sequential illiminates each |
The remaining items are described in the Sequence table above (On Duration, Off Duration, Loops). |
Click the Generatesequence button to populate the
Sequence table, below. All Image-type ROIs are included in every step.
You can edit the image table to manipulate which ROIs appear in a
Time Slot, the On and Off times, and the Loop Count. There are also
buttons to Add, Clone,
⌦ Delete, and re-order the Time Slots.
Control buttons
Below the Sequence table, you can specify:
| Item | Description |
|---|---|
| Sequence Repeats | Number of many times the Sequence table should be repeated. |
| Sequence Trigger | How the sequence should be triggered. |
| Upload Sequence | Send the sequence and ROIs to the Mosaic device. Get in the habit of clicking this button to apply changes from the Sequence list or from updating ROIs in the ROI Manager. |
| Run/Stop | Execute the sequence. Useful for previewing through the microscope eyepieces or “Live” image on the camera. This button should also be pressed to arm the device for an externally triggered sequence. After clicking this button the device should be prepared to receive an external trigger. |
| Attach to Acquisition/Detach | Executes sequence when running Multi-dimensional acquisition. |
| Load/Save | Exports and reload all settings (includes the ROIs). |
Device Properties
Property |
Description |
|---|---|
Exposure |
Pulse duration of mask in seconds. You would not often change this setting directly since the Sequencing window requires you to set the exposure time in the Sequence list, and the exposure value(s) there takes precedence. Changing this is useful for interactive use e.g. in the |
OverlapMode |
Pulses mask when set to Off. Can allow static exposure when set to On. |
OperationMode |
Choose whether to use hardware or software memory. The default, Live, uses the software memory. |
FrameIndexSource |
Setting this to Hardware allows switching between uploaded Frames using the TTL 26-pin D-sub breakout cable, by setting the "Frame Address [7:0]" BNC inputs. Requires |
PixelMode |
Switch between BlackAndWhite and several gray scale settings. |
GrayScaleExposureTime |
Pulse duration of mask in seconds when setting |
InvertMode |
Inverts all uploaded masks before projecting. Invert means setting those DMD pixels outside of the 2D ROI On, and those within the 2D ROI Off. |
SequenceLoopCount |
Number of times to repeat the entire uploaded Frame sequence. You don't need to adjust this since the Sequence window has a textbox for "Sequence Repeats" which takes precedence. |
SequenceLoopSettings |
Shows result of clicking "Upload Sequence" from Sequence window; useful for debugging. Each "Time Slot" entry from the Sequence window list should appear as |
TriggerMode |
Switch between various internal and external TTL trigger settings which are detailed in the Mosaic manual. |
Scripting
Neither the Projector plugin, nor the Sequencing window, exposes any API. Since they are written in Java, one could edit the Java code itself to add desired functionality. See writing plugins for Micro-Manager
The only scripting possible is that which is already built into MMCore,
and thus the “upload bitmap mask” example script detailed below would
work on any SLM device. The example script makes use of setSLMImage()
and displaySLMImage(), but there are several more SLM functions which
one can find by reading through the core
documentation
and searching for the word “SLM” in the javadoc page.
Upload bitmap mask
Create a binary mask from the ImageJ menu by creating a new image
(File > New > Image...) and selecting 8-bit Black 800x600.
Double-click the dropper tool on the ImageJ toolbar and make sure the
current drawing color is white. To draw a freehand shape, double-click
the paintbrush tool, set the thickness to, say, 20 pixels and sketch on
the image with the paint brush.
Open the Script Panel GUI and paste the following code:
  import ij.IJ; // Allows access to basic ImageJ utilities.
  proc = IJ.getImage().getProcessor().duplicate(); // Read the current image.
  pixels = proc.getPixels(); // Extract pixels from ImageJ ImageProcessor object.
  mosaic = mmc.getSLMDevice(); // Get the installed name of the Mosaic device.
  mmc.setSLMImage(mosaic, pixels); // Upload the image to the Mosaic.
  mmc.displaySLMImage(mosaic); // Display the Mosaic.
Running this script will result in projecting the image you have just drawn onto the Mosaic.
If you are re-using a saved TIFF image, you need to open it using
ImageJ’s File menu (not Micro-Manager’s) and again in the ImageJ menu
change Image > Type to 8-bit instead of the default 32-bit
(opening as 32-bit is possibly a bug in ImageJ?).
Click here to search for Mosaic on the Micro-Manager mailing list archive.
Discussion page for Mosaic3 imported from old wiki