User Testing
Setup
P.nanda 07:22, 23 May 2014 (PDT)
Mosaic3 |
Part# MM-8206-75-35, Serial# MM-0201 |
Andor camera |
Part# DR-328G-C02-SIL, Serial# DR-03168 |
Micro-Manager |
version nightly build 1.4.18_20140522 64-bit |
PC |
Dell T3500 Service Tag# 55H99P1, Computer Name US01320 |
Test System Setup
- Fresh install of Micro-Manager into default root
C:\Program Files\Micro-Manager 1.4\directory (all older root directories of Micro-Manager installations were deleted). - Did not restart computer after MM installation.
Tools > Hardware Configuration Wizard (HCW)now shows the Mosaic3 under “Available Devices”. This is noteworthy because in earlier versions of MM, the device would show up as “unavailable” until the DLLs were copied over.- Trying to add the device gives “Error in device Mosaic3: No Mosaic3 devices found.” Of course, none of the Mosaic3 DLLs are present in the root directory yet since they are not yet bundled with the nightly build.
- Installed Mosaic SDK 3.4.17.1 from http://my.andor.com/ from
Software > Drivers and 3rd Party > Andor Mosaic 3 SDK. Selected option to repair MSVC++ 2010 installation when prompted by installer. Chose not to restart. Installed into default root folderC:\Program Files\Andor Mosaic 3 SDK\. - Copied .sdk\*.dll files from root SDK directory to root MM
directory:
- atcore.dll
- atdevmosaic3.dll
- Mosaic3ApiSharedMfc.dll
- Mosaic3SDKWrapper.dll
- Now Mosaic 3 adds successfully with Mosaic3 DLLs copied to MM root directory.
- Confirmed all 4 DLL files are required for Mosaic3 to initialize (renaming any of them adding by adding .bak file extension raises the same initialization “Error in device Mosaic3: No Mosaic3 devices found.” as seen before in HCW).
Scripting
Ran Arthur’s mask projection script verbatim to project a drawn image without doing any calibration - works OK.
Projector Plugin
Setup Tab
| Micro-Manager | Andor iQ | MDC MetaMorph |
|---|---|---|
| On | - | Pulselatestmask |
| Off | Reset under Settings tab | Activateblack |
| Showcenterspot | - | Activatetestmask + Pulselatestmask |
| Allpixels | - | Activatewhite + Pulselatestmask |
| (use script) | Testmask | Activatetestmask |
| - | Whitemask | Activatewhite |
| - | - | Activatelatestmask |
Button nomenclature used in Projector plugin compared to other software
Point and Shoot tab
This feature isn’t very useful, since it’s locked into using a small circle ROI and the size and shape cannot be customized.
ROIs tab
P.nanda 11:17, 27 May 2014 (PDT)
ROI Manager
- All ROIs are uploaded to the DMD regardless of selection in the
ROI Manager, so it’s useful to enable theShow AllandLabelscheckboxes in theROI Manager. - When saving ROIs using
More > Save..., the highlight selections are important; only those ROIs that are highlighted are saved. So to save all, one must first ⌃ Ctrl+ or ⇧ Shift+select all ROIs. Individual ROIs get saved as .roi files and multiple rois as .zip files.
Mosaic Alignment
- To focus the Mosaic epi port focus and DMD lenses:
- Set a very long exposure time (say, the maximum, 200 seconds),
and click on Allpixels (see Figure A).
The long exposure time is needed since there does not appear to
be a way to leave a Mask image continuously on; even the
On button pulses the image for the
duration of
Mosaic3-Exposure. - Close down the Mosaic field diaphram (Figure C) and focus the
Mosaic epi port lens:
- 8206 model has the field diaphram built into the beamsplitter block.
- 8204 model uses the Zeiss microscope epi field stop.
- Other models need a mask slide placed at the Mosaic epi port mouth and focused with e.g. the Mosaic flashlight.
- Adjust the DMD lens focus. Using Arthur’s mask projection script is especially helpful here, with a quadrant mask image (Figure D).
- Set a very long exposure time (say, the maximum, 200 seconds),
and click on Allpixels (see Figure A).
The long exposure time is needed since there does not appear to
be a way to leave a Mask image continuously on; even the
On button pulses the image for the
duration of
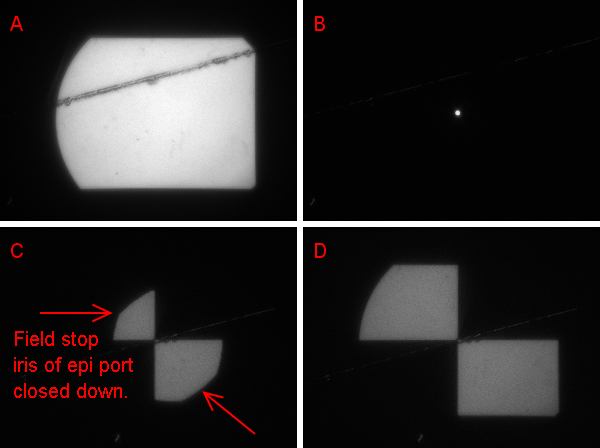
(A, B) Using Allpixels and Centersport buttons, respectively, in Setup tab of Projector plugin. (C) Epi port focused by closing field diaphram. (D) DMD focus using test mask.