| Summary: | Adapter for Canon and Nikon cameras |
| Author: | Koen De Vleeschauwer, kdvelectronics |
| License: | BSD |
| Platforms: | Windows, 32-bit only |
| Devices: | Canon DSLR cameras, Nikon DSLR cameras, Canon Powershot cameras. |
Description
The TetheredCam device driver provides support for Canon and Nikon cameras through third-party commercial software from Breezesys.
Incomplete list of supported cameras:
- Canon EOS 7D, Canon EOS 60D, Canon EOS 50D, Canon EOS 5D Mark II, Canon EOS 550D/Rebel T2i, Canon EOS 500D/Rebel T1i, Canon EOS 1000D/Rebel XS, Canon EOS 450D/Rebel XSi, Canon EOS 40D, 1Ds Mark III, 1D Mark III, 1D Mark IV.
- Nikon D7000, Nikon D90, Nikon D5000, Nikon D300, Nikon D300s, Nikon D700, Nikon D3X, Nikon D3s, Nikon D3, Nikon D200, Nikon D80.
- Canon Powershot G10, G9, G7, SX110 IS, SX100 IS, S5 IS, S3 IS, A640, A620.
See Breezesys for an authoritative list. Camera support may depend upon Microsoft Windows version and camera firmware version used. Camera compatibility can be tested using the trial version of the Breezesys software.
Installation
Installation instructions:
- Go to the Breezesys web site. Verify your camera is supported by PSRemote if you have a Canon Powershot, DSLRRemote Pro if you have a Canon DSLR, or NKRemote if you have a Nikon DSLR camera.
- Download, install and configure the program which corresponds to your camera (PSRemote, DSLRRemote, or NKRemote). Click on the “Release” button to take a picture. Check the picture is downloaded to the PC, and displayed in the PSRemote/DSLRRemote/NKRemote main window.
- If you’re planning to use raw image files, optionally install the Windows Imaging Component codec for your camera’s raw image format.
- With PSRemote, DSLRRemote, or NKRemote still running, start up Micro-Manager.
- Open the Tools menu, and choose Hardware Configuration Wizard.
- In the “Select the configuration file” window: Click on Next.
- In the “Add or remove devices” window: Select PSRemoteCamera if you use PSRemote, NKRemoteCamera if you use NKRemote, or DSLRRemoteCamera if you use DSLRRemote. Click on Add. A small window pops up with “Please type in the new device name”. Click on OK. Click on Done.
- Back in the “Add or remove devices” window: Click on Next.
- In the “Edit pre-initialisation settings” window: Click on Next.
- In the “Setup Serial ports” window: Click on Next.
- In the “Select default devices” window: Choose “CanonPSCam”, “NikonDSLRCam” or “CanonDSLRCam” as default camera. Click on Next.
- In the “Set delays for devices without synchronisation capabilities” window: Click on Next.
- In the “Select devices to synchronize with image acquisition” window: Click on Next.
- In the “Define position labels for state devices” window: Click on Next.
- In the “Save configuration” window: Click “Save and test the new configuration”. Click on Exit.
You can now use the camera in Micro-Manager.
Properties
The following properties are currently implemented:
Binning
Binning groups pixels in both x and y direction. Allowable values are 1,
2, 4, 8.
BitDepth
Specifies the bit depth or dynamic range of the pixel. Actual bit depth
may be less, depending upon the camera image sensor. Allowable values
are “8” and “16”.
Exposure
Exposure sets the exposure time. Units are ms. Setting the exposure time
in Micro-manager requires a properly initialized “ShutterSpeeds” camera
property, and DSLRRemote/NKRemote/PSRemote “Exposure mode” set to “Tv”
or “Manual”.
An exposure time of 0 leaves the camera shutter speed unchanged. This allows setting the shutter speed in DSLRRemote/NKRemote/PSRemote instead of in Micro-Manager.
ImageDecoder
Specifies how images are decoded. Allowable values are “Raw”, “Raw (no
gamma compensation)”, “Raw (no gamma compensation; no white balance)”
and “Windows”.
Raw
Images are decoded using Micro-Manager’s internal decoder,
libraw. The internal decoder is able to decode
raw images only, not jpeg.
Color interpolation is used only if binning is 1. Color interpolation does not take place if binning is 2 or more. If binning is 2 or more, color samples are averaged.
Decoded images are gamma adjusted for sRGB.
Raw (no gamma compensation)
Same as “Raw”, but decoded images have a linear grayscale.
Raw (no gamma compensation; no white balance)
Same as “Raw”, but decoded images have a linear grayscale, and have no
white balance applied.
Windows
Images are decoded using Windows Imaging
Component. The
decoder is able to decode jpeg and, if Windows Imaging Component
codecs
have been installed, raw images.
KeepOriginals
Saves the pictures to disk. Allowable values are 0 and 1. The directory
can be chosen in DSLRRemote, NKRemote or PSRemote File->Preferences.
The pictures are in the format provided by the camera; typically jpeg or
raw.
PixelType
When set to Grayscale, converts images to grayscale. Allowable values
are Color and Grayscale.
ShutterSpeeds
If one wishes to set exposure in Micro-Manager, the “Shutter Speeds”
property has to contain a list of available shutter speed settings,
separated by semicolons. The shutter speeds have to be in the same order
as they appear in the “Tv” drop-down box in
DSLRRemote/NKRemote/PSRemote. Shutter speeds can be floating point
numbers (e.g. 0.25) or fractions (e.g. 1/4). Shutter speeds are
expressed in seconds.
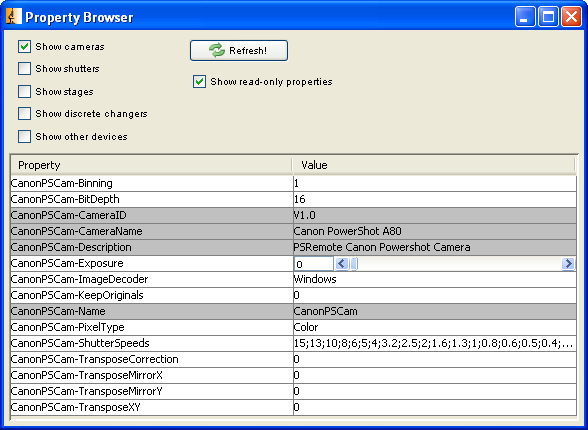
As an example, if a Canon Powershot A80 is used the property “ShutterSpeeds” should be as follows:
15;13;10;8;6;5;4;3.2;2.5;2;1.6;1.3;1;0.8;0.6;0.5;0.4;0.3;1/4;1/5;1/6;1/8;1/10;1/13;1/15;1/20;1/25;1/30;1/40;1/50;1/60;1/80;1/100;1/125;1/160;1/200;1/250;1/320;1/400;1/500;1/640;1/800;1/1000;1/1250;1/1600;1/2000
TransposeCorrection
When set, enables TransposeMirrorX, TransposeMirrorY, TransposeXY.
Allowable values are 0 and 1. Transposing is useful if the camera image
is not oriented as you would expect.
TransposeMirrorX
When set, mirrors image horizontally. Allowable values are 0 and 1.
TransposeMirrorY
When set, mirrors image vertically. Allowable values are 0 and 1.
TransposeXY
When set, rotates image. Allowable values are 0 and 1.
Notes
- Large images require large amounts of memory. If image acquisition
works in DSLRRemote/NKremote/PSRemote but fails in micro-manager,
try increasing memory available and reducing memory used.
- Go to ImageJ, choose Edit > Options > Memory and increase maximum memory. See memory issues.
- Go to Micro-Manager, choose Tools > Options and select “Conserve RAM”.
- Many algorithms in Micro-Manager require grayscale images. Feeding a color image to a grayscale-only algorithm typically produces errors such as “Unsupported pixel type” or “Invalid data type”. Setting both “PixelType” to “Grayscale” and “KeepOriginals” to “1” will send a grayscale image to Micro-Manager but allow you to read the original color images from disk.
- If you wish to automatically load your “Shutter Speeds” settings upon startup, create a Micro-Manager configuration group called “System”. In the “System” configuration group, create a preset group called “Startup” which includes “Shutter Speeds”. These settings will be applied every time you start up Micro-Manager.
- To get a live view display in DSLRRemote, NKRemote or PSRemote, open the “Camera” menu and select “Live View”.
- This driver is Windows only. To use Canon and Nikon cameras on MacOS X and Linux systems see GPhoto.
Click here to search for TetheredCam on the Micro-Manager mailing list archive.