| Summary: | Adapter for PTP/MTP cameras |
| Author: | Koen De Vleeschauwer, kdvelectronics |
| License: | LGPL |
| Platforms: | MacOSX, linux |
| Devices: | PTP and MTP cameras connected via USB. |
| Example Config File: | MMConfig_GPhoto.cfg |
Description
The GPhoto device driver provides support for cameras through gphoto2. In general these are cameras which connect through USB and use Picture Transfer Protocol (PTP) or Media Transfer Protocol (MTP). See 1 for a list of cameras which support remote capture; this includes most recent Canon and Nikon DSLR models. Cameras marked “Viewfinder” also support remote Live View.
Installation
Installation instructions:
- Download Mac OS X Micro-Manager 1.4.5 or later.
- Connect the camera to the computer with a USB cable.
- Depending on camera model, you may have to use PTP/MTP mode or normal mode (“USB mass storage”). See if the entry for your camera in the list of camera models says “Normal” or “PTP”.
- On Mac OS X, you have to kill the PTPCamera process to use PTP/MTP mode with micro-manager. Open Applications/Utilities/Activity Monitor, select “PTPCamera” and click on “Quit Process”. You will need to kill the PTPCamera process every time you switch the camera on, or connect the camera to the mac.
- With the camera switched on, start up Micro-Manager.
Add GPhoto to your hardware configuration:
- Open the Tools menu, and choose Device/Property Browser. If a GPhoto camera is already present, go to “Verify your camera has been detected”.
- Open the Tools menu, and choose Hardware Configuration Wizard.
- In the “Select the configuration file” window: Click on Next.
- In the “Add or remove devices” window: Click on Add.
- In the “Add device” window: Select GPhoto. Click on Add. A small window pops up with “Please type in the new device name”. Click on OK. Click on Done.
- Back in the “Add or remove devices” window: Click on Next.
- In the “Edit pre-initialisation settings” window: Click on Next.
- In the “Setup Serial ports” window: Click on Next.
- In the “Select default devices” window: Choose “GPhoto” as default camera. Click on Next.
- In the “Set delays for devices without synchronisation capabilities” window: Click on Next.
- In the “Select devices to synchronize with image acquisition” window: Click on Next.
- In the “Define position labels for state devices” window: Click on Next.
- In the “Save configuration” window: Click “Save and test the new configuration”. Click on Exit.
Verify your camera has been detected:
- Open the Tools menu, and choose Device/Property Browser.
- Verify your camera appears under “GPhoto-CameraName”. On systems with more than one camera, you have to manually select the correct camera by clicking on the “GPhoto-CameraName” property value.
You can now use the camera in Micro-Manager.
Properties
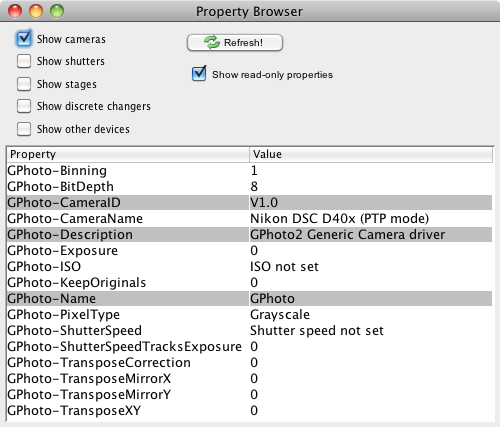
To access configuration settings, open the “Tools” menu and select “Device/Property Browser”. The following settings are available:
Binning
Binning groups pixels in both x and y direction. Allowable values are 1,
2, 4, 8.
BitDepth
Specifies the bit depth or dynamic range of the pixel. Actual bit depth
may be less, depending upon the camera image sensor. Allowable values
are “8” and “16”. When set to “16”, raw images will be decoded with
linear gamma.
CameraName
Selects which camera is used on systems with more than one camera.
Selecting an entry will (re)connect to the camera specified; there is a
brief delay while camera settings are read.
Exposure
Exposure sets the exposure time. Units are ms.
ISO
Allows setting the camera ISO, or gain. If “ISO not set” is selected,
micro-manager will not set camera ISO. This allows manually setting ISO
on the camera itself.
KeepOriginals
Saves the pictures to disk. Allowable values are 0 and 1. Pictures are
stored in the /tmp directory. The pictures are in the format provided by
the camera; typically jpeg or raw.
PixelType
When set to Grayscale, converts images to grayscale. Allowable values
are Color and Grayscale.
ShutterSpeed
Allows selecting the shutter speed. If “Shutter speed not set” is
selected, micro-manager will not set camera shutter speed. This allows
manually setting shutter speed on the camera itself.
ShutterSpeedTracksExposure
When set, shutter speed will change every time the exposure time
changes. The shutter speed will change to the setting closest to the
exposure time, if possible.
TransposeCorrection
When set, enables TransposeMirrorX, TransposeMirrorY, TransposeXY.
Allowable values are 0 and 1. Transposing is useful if the camera image
is not oriented as you would expect.
TransposeMirrorX
When set, mirrors image horizontally. Allowable values are 0 and 1.
TransposeMirrorY
When set, mirrors image vertically. Allowable values are 0 and 1.
TransposeXY
When set, rotates image. Allowable values are 0 and 1.
Notes
- If the camera supports remote “Live View”, “Live View” is used in live mode. “Live View” produces a low-resolution real-time image. The exposure time property is used to limit the number of images per second in live mode. E.g. an exposure time of 100ms will result in maximum 10 images per second. An exposure time of 0 produces the maximum frame rate. If Micro-Manager becomes unresponsive when using “Live View”, choose an exposure time of 40ms or more.
- Best results are obtained setting camera image type to raw, and BitDepth to 16.
The driver decodes “raw” images so that a pixel in the decoded image corresponds to a Bayer cell on the image sensor. A single pixel in the decoded image then corresponds to one red sensor, one blue sensor, and the average of two adjacent green sensors in the camera. The resulting image has half the width and half the height of the camera sensor matrix, and is free of demosaicing or debayering artifacts.
Using JPEG images may introduce decompression artifacts and should be avoided if authoritative data is needed.
- Many algorithms in Micro-Manager require grayscale images. Feeding a color image to a grayscale-only algorithm typically produces errors such as “Unsupported pixel type” or “Invalid data type”. Setting both “PixelType” to “Grayscale” and “KeepOriginals” to “1” will send a grayscale image to Micro-Manager but allow you to read the original color images from disk.
- On Mac OS X, you have to kill the Apple PTPCamera process every time
after connecting your camera, after switching your camera on, and
before running micro-manager. If you wish to automate this, try the
following:
- Open Applications/AppleScript/Script Editor.
- Create a one-line AppleScript tell application “PTPCamera” to quit
- Select File > Save As… and save as “killptpcamera”, file format “application”.
- Close Script Editor.
- Open Applications/Image Capture.
- On MacOSX 10.5 or lower, select Preferences… and set “When a camera is connected, open:” to “killptpcamera”.
- On MacOSX 10.6 or higher, preferences are set per device. Connect and switch on the camera. Select the camera in the Image Capture Devices list. Then set “Connecting this camera opens:” to “killptpcamera”.
- Close Image Capture.
This causes PTPCamera to quit every time it starts up. To revert to normal behavior, open Image Capture and set “Connecting this camera opens:” to “No application”.
- The driver allows setting camera shutter speed and ISO. Additional parameters may be set in the ~/.gphoto/settings file in your home directory.
On selected Nikon and Canon cameras it is possible to capture images to camera ram instead of to the memory card. This speeds up image capture as ram is faster than memory card. Image capture to ram is not switched on by default as not all cameras support this. To enable, exit Micro-Manager and add the following line to ~/.gphoto/settings:
ptp2=capturetarget=sdram
To disable:
ptp2=capturetarget=card
See the gphoto2 command-line utility for more details.
Click here to search for GPhoto on the Micro-Manager mailing list archive.