Summary: Thorlabs Device Adapter Library
|
Summary: |
XY Stage (brushless DC motor), Z Stage (Piezo), both using controller BBD 102, Integrated Filter Wheel (5 or 8 positions) |
|
Author: |
|
|
License: |
BSD |
|
Platforms: |
All platforms (uses serial port) |
|
Devices: |
XYStage, PiezoZStage, FilterWheel |
|
Example Config File: |
XY Stage
XY stage device adapter that works with BBD 102 brushless DC motor contoroller1 and supports high speed motorized scanning stage MLS 203 2.
Setup
XY Stage adapter requires only a serial serial port (RS-232). One port should be reserved for this stage and initialized with the following parameters:
BaudRate: 115200
Handshaking: Off
Parity: None
StopBits: 1
(all other micro-manager port parameters can be left with defaults)
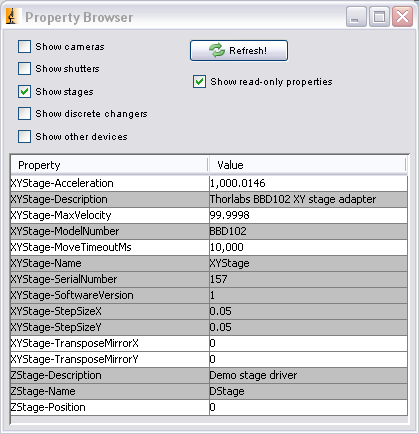
The only parameter that is required for configuration of the stage is the name of the serial port (e.g. COM2) attached to the controller. If the port was correctly set and connected in the previous step, micro-manager will load the stage adapter at startup. In Device Property Browser (menu: Tools | Device Property Browser…) the stage appears as:
Using the XY stage
The stage uses absolute XY coordinates and any positions recorded in micro-manager will always correspond to the same physical location. However, because of this feature, each time we power-up this stage needs to be “homed” before sending any commands. If we try to move it before homing, error message will pop up. Homing is not automatic on startup because during this procedure stage moves to its limits and in may cause one of the objectives to hit the stage frame, if the objective turret is left high enough. This is an issue with any XY stage and the user always needs to make sure that objective turret is in the safe position before homing.
“Home” procedure
The stage needs to be homed once after each power-up. Homing is not necessary if we just exit and re-start the software without powering down. There are three alternative ways to home the stage. Choose one of the following:
Calibrate command
Open Stage Position List dialog and press “Calibrate” button (menu: Tools | XY List…).
Script
Copy the following script, paste it into the Script Editor (menu: Tools | Script Panel…) and press “Run” button.
// home XY Stage
gui.message("Homing started...");
xyStage = mmc.getXYStageDevice();
mmc.home(xyStage);
x = mmc.getXPosition(xyStage);
y = mmc.getYPosition(xyStage);
gui.message("Done! Home position [um]: " + x + ", " + y);
This script can be saved and stored in the Script-Shortcut list for future use.
Special micro-manager startup script
To automate the process of homing so that you get prompted for it each time you start micro-manager you can use startup scripts. Startup script must reside in the root directory of the micro-manager software and its name is specified in the Options dialog (menu: Tools | Options…). Add the following code to the existing startup script (or create a new one):
// startup script to home Thorlabs BBD102 XY stage
//
import ij.gui.GenericDialog;

GenericDialog dlg = new GenericDialog("HOME command - XY Stage", null);
msg = "WARNING!!! The XY stage is about to move."
      + "Make sure objectives are out of the way."
      + "If you are in doubt about what to do Cancel this command!";
dlg.addMessage(msg);
dlg.showDialog();
if (dlg.wasCanceled())
    return false;

gui.message("Homing started...");
xyStage = mmc.getXYStageDevice();
mmc.home(xyStage);
x = mmc.getXPosition(xyStage);
y = mmc.getYPosition(xyStage);
gui.message("Done! Home position [um]: " + x + ", " + y);
Each time you start micro-manager the script will be automatically executed and you will be prompted to home the stage and warned to move objectives to the safe position.
Adjusting motion parameters
The stage adapter lets us adjust velocity and acceleration to match our application. If you use default values for velocity and acceleration, no further actions are necessary. However if you change velocity/acceleration to slow down the stage, you may run into problems with micro-manager timeouts.
The default timeout interval for micro-manager is 5 seconds. If any of the move commands takes more than 5 seconds (or whatever you have set instead) to complete, micro-manager will time out you will get an error message to that effect. If you get timeout error messages on lengthy move commands, try changing the micro-manager timeout interval to 10 seconds or more. To change timeout interval open Device Property Browser (menu: Tools | Device Property Browser…) and set the desired value both for the Core-TimeoutMs and XYStage-MoveTimeoutMs properties.
Note that change in the Property Browser is not permanent. If you exit the application and re-start these values will return to their defaults. To make settings permanent use System/Startup configuration preset mechanism in micro-mananger. Consult micro-manager documentation for more information.
Testing and automation
For verification and testing of the stage we can load test configuration file MMConfig_Thorlabs.cfg. This configuration file contains XYStage tied to the com port and a couple of device simulators (demo adapters) acting as demo camera and focus stage. The configuration probably won’t work right away because the COM port on your system may be different. To edit the port information use Hardware Configuration Wizard (menu: Tools) as with any other device.
After the configuration loaded without errors we can use the following script to test the stage:
// Exercise XY stage
import java.text.DecimalFormat;

// obtain xy stage name
xyStage = mmc.getXYStageDevice();

gui.clearOutput();

// report starting position
x = mmc.getXPosition(xyStage);
y = mmc.getYPosition(xyStage);
gui.message("Starting position [um]: " + x + ", " + y);

// define test points in um
ArrayList xPos = new ArrayList();
ArrayList yPos = new ArrayList();

xPos.add(0.0);
yPos.add(0.0);

xPos.add(5000.0);
yPos.add(30000.0);

xPos.add(70000.);
yPos.add(18000.0);
DecimalFormat FMT2 = new DecimalFormat("#0.0");

for (int i=0; i<xPos.size(); i++) {
    start = System.currentTimeMillis();
    mmc.setXYPosition(xyStage, (double)xPos.get(i), (double)yPos.get(i));
        mmc.waitForDevice(xyStage);
    end = System.currentTimeMillis();
    gui.message("Reached point " + i
                    + " at (" + xPos.get(i) + "," + yPos.get(i) + ")"
                    + " in " + (end-start) + " ms");

    x = mmc.getXPosition(xyStage);
    y = mmc.getYPosition(xyStage);
    gui.message("Current position [um]: " + FMT2.format(x) + ", " + FMT2.format(y));
}
Running this script in the Script Panel (menu: Tools | Script Panel…) should produce the following output:
Starting position [um]: 70000.0, 18000.0
bsh %
Reached point 0 at (0.0,0.0) in 1000 ms
bsh %
Current position [um]: -0.2, -0.0
bsh %
Reached point 1 at (5000.0,30000.0) in 594 ms
bsh %
Current position [um]: 5000.2, 30000.4
bsh %
Reached point 2 at (70000.0,18000.0) in 922 ms
bsh %
Current position [um]: 69999.8, 18000.0
bsh %
If this script does not generate any errors the stage is working properly. Timing on your system may be different, depending on the motion parameteres.
Piezo Z Stage
Piezo Z stage device adapter that works with BBD 102 contoroller3
Setup
Piezo Z Stage adapter requires only a single serial port (RS-232). A port reserved for this stage and initialized with the following parameters:
BaudRate: 115200
Handshaking: Off
Parity: None
StopBits: 1
(all other micro-manager port parameters can be left with defaults)
The only parameter that is required for configuration of the stage is the name of the serial port (e.g. COM1) attached to the Z stage dedicated controller. If the port was correctly set and connected, micro-manager will load the stage adapter at startup.
Using the Piezo Z Stage
The stage uses absolute Z coordinates and any positions recorded in micro-manager will always correspond to the same physical location. Because of this feature, each time we power-up this stage needs to be “zeroed” before sending any commands.
Zeroing is automatic on startup and takes about 27 seconds to complete. If we try to move the stage before zeroing sequence is complete, an error message will pop up. Zeroing is required only the fist time the stage is used after powering it up. If we just re-start the software without powering down the stage controller, zero sequence will be automatically skipped and the stage can be used immediately after startup.
Integrated filter wheel
Integrated filter wheel adapter requires only a single serial port (RS-232). A port reserved for this stage and initialized with the following parameters:
BaudRate: 115200
Handshaking: Off
Parity: None
StopBits: 1
(all other micro-manager port parameters can be left with defaults)
The only parameter that is required for configuration of the filter wheel is the name of the serial port (e.g. COM1) attached to the dedicated controller. If the port was correctly set and connected, micro-manager will load the filter wheel adapter at startup.
Using the wheel
After power up the filter needs to perform homing procedure which takes about 20 seconds. On start-up micro-manager will automatically start homing the wheel in the background - no action is required from the user. If you attempt to use the wheel right after start up, while the home procedure is in progress, an error might be reported by micro-manager. In that case wait for few more seconds and try again.
If configured and initialized properly the filter wheel should report either 5 or 8 available positions.
If an error occurs during operation because of mechanical blockage or overloading, remove the obstacle (or reduce the weight of attached filters) turn the power on and off and re-start the micro-manager.