|
Summary: |
Use the Fiji Mist plugin to stitch one time point or location and use its output to stitch large datasets. |
|
Authors: |
Nico Stuurman |
|
License: |
BSD |
|
Platforms: |
All supported platforms |
WorkFlow
Use the Mist plugin in Fiji
The Microscopy Image Stitching Tool is a wonderful Fiji plugin to stitch images based on image content.
Install it in Fiji using the Fiji updater tool.
To acquire data in Micro-Manager that can be stitched, either use the HCS Site Generator plugin or the Grid Creator in the PositionList to acquire images with about 10% overlap,
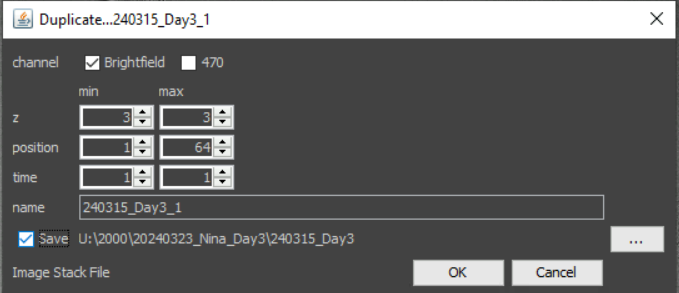
If you would like to have a large (many time points and/or many positions) stitched, first save a a single time point and only the positions that you want stitched in Micro-Manager as Image Stack file. Under the gear icon of the viewer, select “Duplicate”, Select a single z plane, the number of positions that is in one large field of view (so, if your grid was 8 x 8 images, sleect 64 positions), a single channel and a single time point.
Saved data (sorted by type) will look like this:

Now open the Mist plugin in Fiji (Plugins > Stitching > Mist).
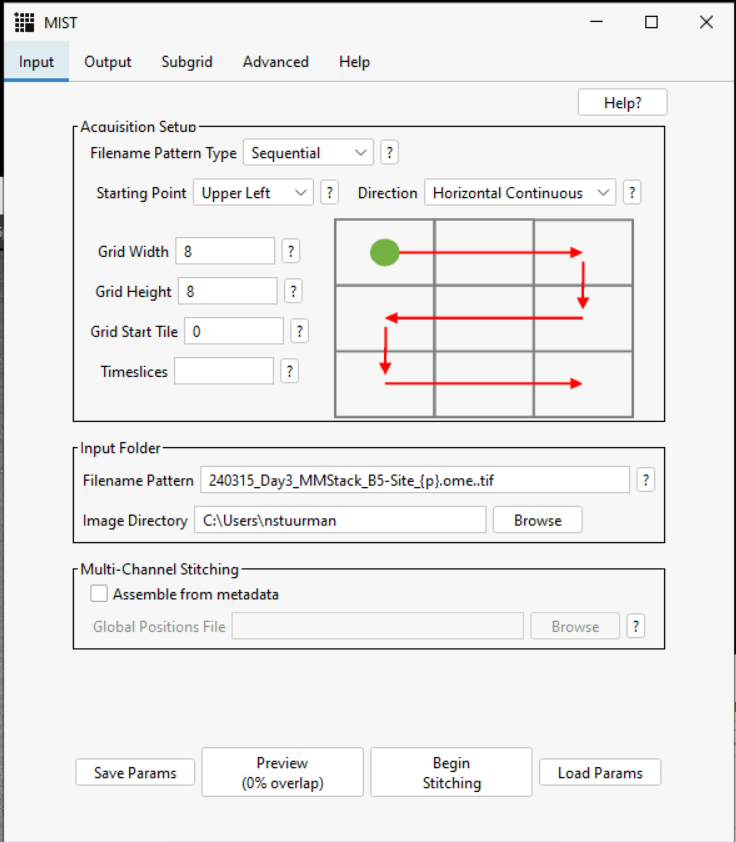
Set “Filename Pattern Type” to “Sequential (that is how Micro-Manager numbers files), Starting point depends on camera rotation, it is nice if your camera is oriented such that you can set the Starting Point to “Upper Left”. Direction: HCS Site Generator “Snake” corresponds to “Horizontal Continuous”, TypeWriter to “Horizontal Combing”. Set the Grid Width and Hieiht to the number of images that you have in rows and columns.
The Filename Pattern is important. Copy one of the file names from your list (do not forget to include the .tif at the end), and replace the Site number with “{p}” (the Mist plugin uses that as a plcae holder for the expected Site number). In the Output tab, you tell the Mist plugin where to store its results. You can check your settings with the Preview button. Make sure that the resulting image makes sense, then click “Begin Stitching”.
Output (in the directory specified in the “Output” panel, should look like this:

The file “img-global-positions-0” will be used by the Micro-Manager mist plugin to stitch the remainder of your data.
In Micro-Manager, open the data you want to stitch (most likely this is a large data set, so use “Open > Virtual”). Click on the Gear icon in the viewer and sleect “Analysis > Stitching using the Mist plugin”.
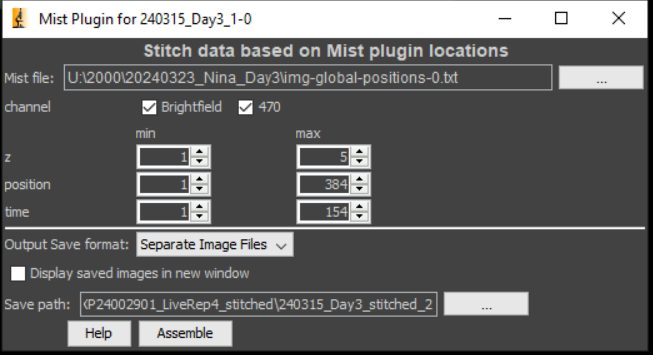
Make sure that “Mist file:” points to the file “img-global-position-0” thta you just created. Select the channel, z slice, and time points that you want to stitch, select an output format (“Separate Image Files” is a good option here, since it is most compatible with other software), and set where you would like to sabe the output. Click “Assemble”. For large datasets, it can take a long time to stitch…
Happy stitching, and thank to the team at the NIST that build the MIST plugin.
Nico Stuurman, April 2024