|
Summary: |
Adds support for an XBox Gamepad. It lets users assign device properties to thumb sticks and Beanshell scripts to button presses |
|
Authors: |
Vikram Kopuri (ASI), Nico Stuurman (port to 2.0) |
|
License: |
BSD |
|
Platforms: |
Windows only |
|
Requires: |
Xbox One controller (tested) or XBox 360 controller (not tested) |
Plugin GUI
Gamepad Status

The controller/gamepad isn’t added thru the hardware config wizard, instead the plugin when launched looks for it. Then it displays the message “GamePad:NOT Found”,“..FOUND”,“..Connecting” and “..Error Connecting” accordingly.
A good guide on pairing your xbox Gamepad to PC is here.
If you already have the gamepad paired, press the HOME button. The button lights up, blinks a few times and once its connected to the PC it glows solid. Moments later the plugin will update the status to “GamePad:Found”
Save and Load Buttons

The button and joystick assignments aren’t automatically saved by the plugin between session (Note: they are in the 2.0 version of the plugin), so use these buttons to save and load all thumb stick and button assignments. Currently, the assignment files saved by 1.4 can be used in 2.0.
Axis Assignment Table

Axes are analog controls on the gamepad.
- The Two thumb sticks return a decimal point value between +1 to -1.The thumb sticks also have two axis each X and Y.
- The triggers return a decimal point value between 0 to +1.
- The DPAD can be read both as a button or axis , it returns a value of “-1” when not pressed. “1” when Up is pressed, “3” when right is pressed, “5” when down is pressed and “7” when left is pressed.
Using the axis assignment table user can pick a device and device property that is adjusted when the axis is moved.
A common use of these controls is to move a stage. For this assign the axis to a stage’s vector move property. In the case of an ASI’s XYstage the property “VectorMoveX-VE(mm/s)” and “VectorMoveY-VE(mm/s)” are appropriate. They accept input in mm/sec and typical max value for the property is 4-5mm/sec. So here the multiplier column comes handy, when a multiplier of 3 is picked. Then the thumbstick deflection which varies from +1 to -1 , turns into +3 to -3 , and when applied to the device property , the stage will move +3 mm/sec to -3 mm/sec.
Button Assignment Table

Unlike the axes controls, buttons have only two states, pressed or unpressed. The Action column of the Button assignment table lets user pick from a list of predefined actions (like Snap, Live view toggle etc) or “Run_Beanshell_script” to specify a beanshell script to be run on the button press. The path to the script is specified with the 3rd column. Clicking on it displays a File Chooser dialog box and user can navigate and pick the script to run.
A common way to setup the DPAD would be to move a stage on presses. For this make 4 different beanshell scripts with the following codes gui.setRelativeXYStagePosition(X# in um,Y# in um); each with a different move and assign them to the DPAD buttons like this:
gui.setRelativeXYStagePosition(1000,0);
gui.setRelativeXYStagePosition(-1000,0);
gui.setRelativeXYStagePosition(0,1000);
gui.setRelativeXYStagePosition(0,-1000);
Find some example scripts here.
Controller Layout
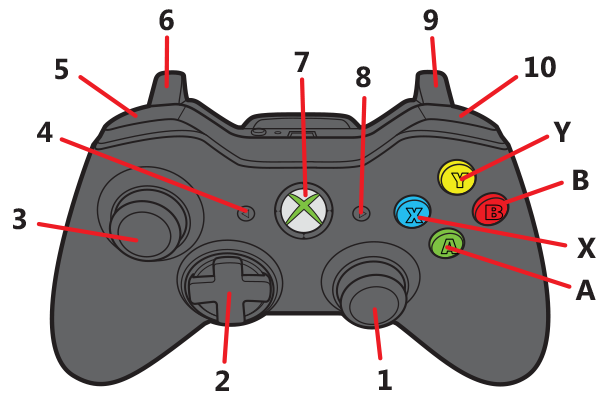
- Right Thumbstick X/Y
- Directional pad or DPAD
- Left Thumbstick X/Y
- Back button
- Left shoulder button
- Left trigger
- Home button
- Start button
- Right trigger
- Right shoulder button
- Y,B,A,X buttons
Click here to search for Gamepad on the Micro-Manager mailing list archive.